DC53 Punch Stock
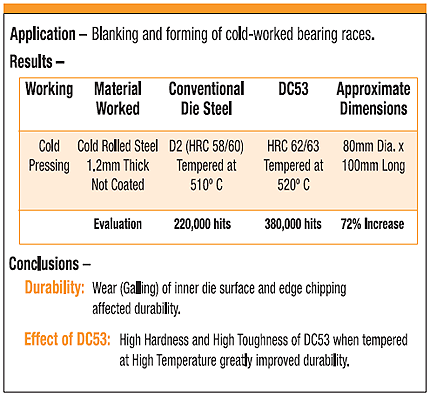
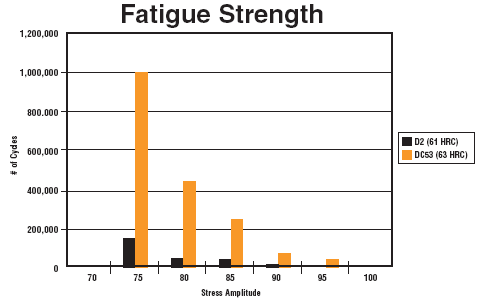
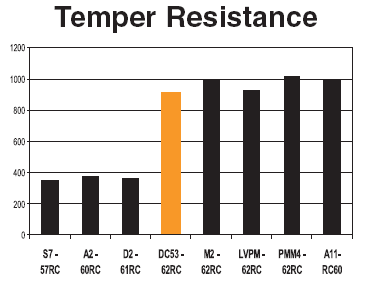
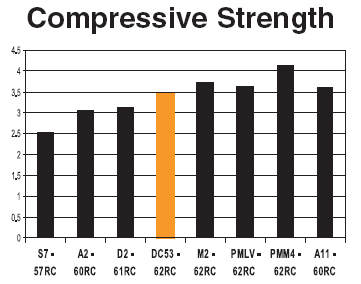
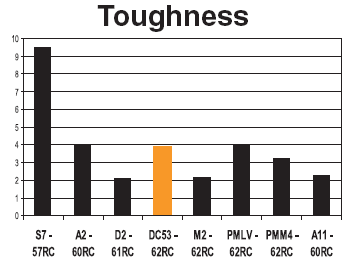
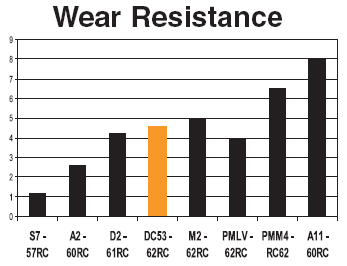
DC53 is a general purpose cold work tool steel with exceptional Toughness, Wear Resistance, Compressive Strength and Temper Resistance.
- Uniform distribution of fine carbides
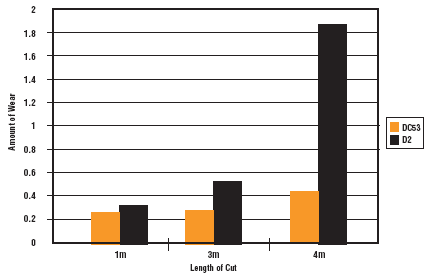
- Excellent galling & wear resistance
- Exceptional toughness & fatigue resistance
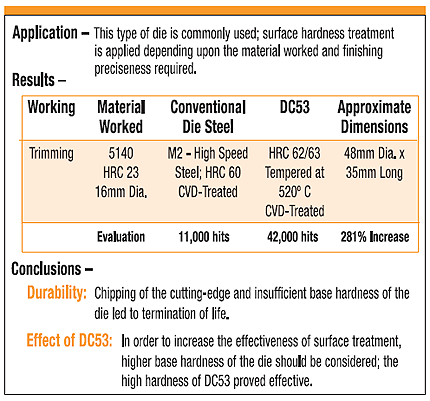
- High temper resistance to support PVD & nitride surface treatments
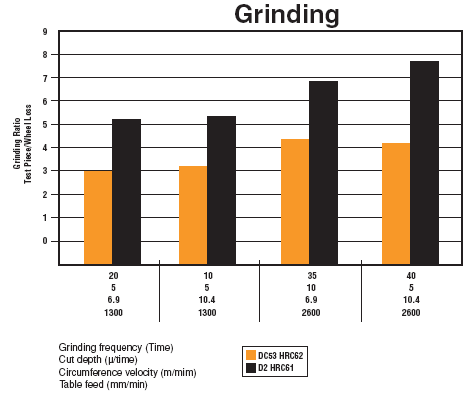
- Machining & grinding characteristics superior to most other tool steels
- Rounds 1/4″ to 20″
- Flats 1/2″ to 12″ thick in widths up to 24″
These properties are obtained through its chemistry as well as its unique manufacturing processes of ladle refinement, vacuum degassing and forging methods. DC53 also has excellent machining characteristics and is well suited as a sub-straight for PVD surface treatments. DC53 can also be hot process CVD and TD (Thermal Diffusion) coated however post heat treat is generally recommended.
Product Brochure
Physical Properties
Description | Length |
.256″ DIA. CG +.002-000 DC53 Punch Stock | 10-12 ft |
.310″ DIA. CG +.002-000 DC53 Punch Stock | 10-12 ft |
.318″ DIA CG +.002-000 DC53 Punch Stock | 10-12 ft |
.324″ DIA. CG +.002-000 DC53 Punch Stock | 10-12 ft |
.383″ DIA. CG +.002-000 DC53 Punch Stock | 10-12 ft |
.402″ DIA. CG +.002-000 DC53 Punch Stock | 10-12 ft |
.404″ DIA. CG +.002-000 DC53 Punch Stock | 10-12 ft |
.443″ DIA CG +.002-000 DC53 Punch Stock | 10-12 ft |
.447″ DIA CG +.002-000 DC53 Punch Stock | 10-12 ft |
.507″ DIA CG +.002-000 DC53 Punch Stock | 10-12 ft |
.508″ DIA CG +.002-000 DC53 Punch Stock | 10-12 ft |
.510″ DIA. CG +.002-000 DC53 Punch Stock | 10-12 ft |
.522″ DIA CG +.002-000 DC53 Punch Stock | 10-12 ft |
1.010″ DIA CG +.002-000 DC53 Punch Stock | 10-12 ft |

Primary Carbides
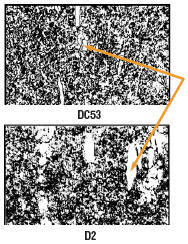
Primary carbides in DC53 are relatively small with highly uniform distribution as compared to other tool steel grades such as D2. This helps to provide DC53 with it’s superior toughness, and fatigue resistances.
Fabrication Characteristics
Machining

Faster feeds and speeds reduce machining cost and yielding an improved surface finish.
WIRE EDM
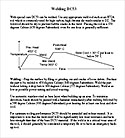
WELDING
Heat Treatment
DC53 Heat Treat – DC53 is only as good as the heat treatment it receives. The heat treat process can be broken down into two segments, Hardening & Tempering. DC53 is typically air hardened using a vacuum furnace however it can also be processed by using a gas or electric furnace with or without a controlled atmosphere when wrapped in stainless foil or salt bath hardened by immersing the part in high temperature salts.
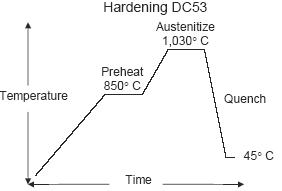
Quench rates using 3 bar pressure or higher are not recommended due to the potential for distorting and the higher stress involved. The quenching phase converts the majority of the tool steel from the austenitic state to an un-tempered martensite condition. The part should then be immediately tempered once it has reached 45° C (120° F). Be sure to check hardness at this point to assure that the part has reached the desirable hardness if at least 64 HRC.

Salt Bath Hardening – Per-heat the part to 850° C (1,550° F) until uniformly heated. Austenitize in a molten salt bath at 1,030° C (1,885° F) for a minimum of 5 minutes. See chart below for details. Salt quench and then allowed to slow cool in still air to 45° C (120° F) to 65° C to (150° F) before tempering.
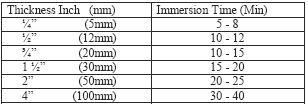

Material growth .10% to .15% (.001” to .0015” per inch).
An optional third temper recommended for intricate high precision components requiring EDM or PVD coatings.
Tempering – Tempering is commonly performed in a non-atmosphere controlled convection furnace. The first temper should be conducted as soon as the part can be handled at about 45° C (120° F) to 65° C to (150° F). The part should be allowed to cool to ambient temperature between subsequent tempers.

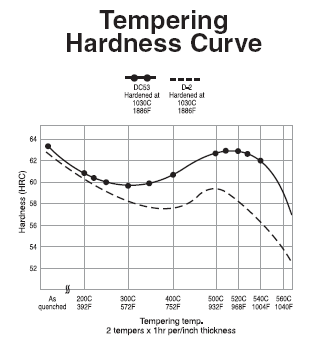
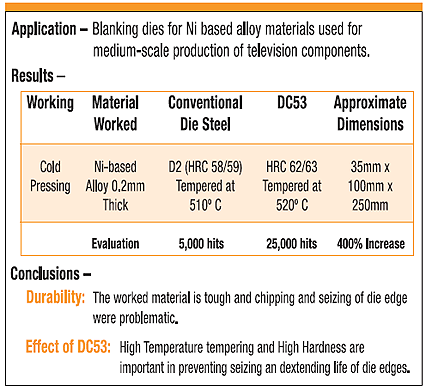
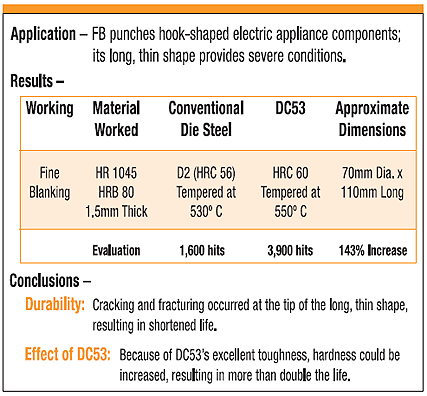
To achieve HRC 60-62, temper DC53 twice at 540° C (1,005° F) for 60 to 90 minutes per inch in thickness in cross section. The minimum tempering time is 90 minutes. Temper twice at 520° C (970° F) for the same amount of time to achieve HRC 62-64. A hardness les than HRC 60 is not generally recommended for most punch and die components due to insufficient compressive strength typically needed for stamping applications. Applications requiring additional toughness can be double tempered at 550° C (1,020° F) to achieve HRC 58-60.
If size change or distortion of hardened DC53 due machining, grinding, applying surface treatments or wire EDM work is a concern in high precision applications, an optional third temper of 400° C (750° F) can be applied to the initial heat treat process. This final tempering temperature is high enough to temper the remaining un-tempered martensite, but not high enough to convert additional retained austenite resulting in a more stable structure. The third temper is typically not necessary if the tool has been hardened using the salt bath process.
Inspection – Conducting a hardness test after the heat treat process is complete is just one method used to measure the quality of heat treat. For additional quality assurance, it is also recommended that a precise dimensional measurement be taken from a given feature both before and after the entire heat treat process to assure that the proper amount of growth has taken place. Properly heat treated DC53 can be expected to grow approximately .1% to .1 ½% (.001” to .0015” per inch) of its original size before hardening. Shrinkage of the tooling can be a sign of problems in the hardening and or tempering process and is generally attributed to excessive amounts of retained austenite.
Vacuum Tempering – As when tempering most tool steels, vacuum tempering is a more difficult process to control than convection tempering and fluctuations in hardness results are to be expected. It should only be used when absolutely necessary and ideally be limited to smaller parts with a simple geometry.
Cryogenics – Freezing at 185° C (-300° F) between the first and second temper may also be beneficial to toughness however, specific data is not readily available. It is important to note that cryogenics should always be followed by a temper.
Forging – For special applications, DC53 can also be forged into many shapes. The temperature for forging is between 900° C (1,650° F) and 1,100° C (2,010° F). Annealing after forging in highly recommended to minimize stress in the part and assuring
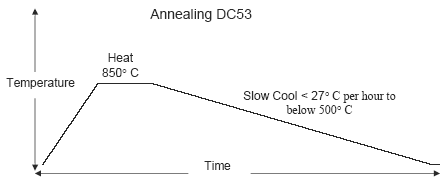
Annealing – DC53 can be annealed by uniformly heating the part to 800° C (1,475° F) to 850° C (1,550° F), and holding for 2 hours followed by a slow cooling at no more than 27° C (50° F) degrees per hour to until the it has dropped below 500° C (930° F). The part can then be removed from the furnace and allowed to continue to cool in still air to room temperature. If decarburization is a concern, annealing vacuum is recommended. In order to minimize size change, the pre-coating and post heat treat will need to be as similar as possible.
Surface Coating
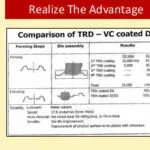
| DC53 Surface Coating | Comparison of TRD-VC Coated D2 |
 DC53 Surface Coating DC53 Surface Coating | 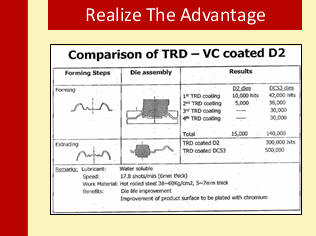 Comparison of
TRD-VC
coated D2 Comparison of
TRD-VC
coated D2 |
BENEFITS
Lorem ipsum dolor sit amet, consectetur adipiscing elit. Ut elit tellus, luctus nec ullamcorper mattis, pulvinar dapibus leo.


